- Can be accessed through protocols other than HTTP, such as TCP or named pipes.
- Added support for web services standards such as WS-Security, WS-Addressing, WS-ReliableMessaging, WS-Coordination and WS-AtomicTransaction.
So what can you do if you need to consume a web service that requires support for alternate protocols, those latter web services standards or both?
One option, which I included in a PBDJ article from January of 2012, is to create a WCF client using PowerBuilder.Net or Visual Studio.Net, packaging that up in a .Net assembly, and then exposing the assembly to PowerBuilder Native as a COM object via COM Callable Wrappers.
That technique works, but it requires either:
- configuration of the desktop (adding the assembly to the GAC and creation of registry entries) or
- a side-by-side assembly deploy and creation of manifest files to support registry free COM
In some workplaces the first isn't allowed, and the second is rather complicated.
What we're going to look at today is another approach for consuming more advanced web services from PowerBuilder Native, but one which won't require desktop configuration or complicated manifest creation. What is will require is a web server inside your firewall that you can deploy a proxy WCF service on.
For this example, we're going to use the Amazon Web Services Product Advertising API as the more complicated web service that we can't access directly from PowerBuilder Native. That's largely because Amazon requires custom headers -- including signing of the request. That's the same example that I used in that article from 2012. We're going to use very similar code, so I won't explain what all of it does. You can refer back to the 2012 article for that explanation. What I will explain though are the differences between the code we're going to use for this example and the code from 2012.
Once again for this example we're going to use PowerBuilder.Net to create the WCF client. The same technique will work if you decide to use Visual Studio.Net instead, the main differences are in the way that you'll configure the WCF service you create with that IDE.
The first thing we'll need to do is create a WCF service.
 |
| Figure 1 - New WCF Service |
When you get to the page in the wizard that asks you for the object to create, select Custom Nonvisual and give it a name:
 |
| Figure 2 = WCF Service Object |
Although the "Finish" button on the wizard is enabled at this point I would recommend clicking "Next" instead until you get to the Hosting Options page. On that page, select "Console ("Self-Hosted") application rather than the default of IIS. Now click "Finish".
 |
| Figure 3 - WCF Service Hosting Options |
We'll come back to the WCF Service in a bit. The next thing we want to do is create a WCF client proxy in the WCF Service target.
 |
| Figure 4 - New WCF Client |
When you get to the page that asks for the service URL, we (at least at the time of the writing of this article) need to do a bit of a hack. What you would normally do here is enter the URL that the Amazon Web Services WSDL is located:
 |
| Figure 5 - WCF Client URL |
The problem isn't with PowerBuilder. It's actually with the Amazon Web Services. The bug that was filed on the problem back in 2011 is available here, and it also discusses the solution. I'm not quite sure why Amazon hasn't fixed it yet. The problem is that what Amazon says it's going to return int the WSDL for the ImageSets property of an Item and what it actually does return are two different things. Perhaps Java or other web service clients handle that gracefully, but C# doesn't. If you create a proxy directly off Amazon's WSDL and call the ItemSearch method, what you'll get is a .Net exception of:
error CS0030: Cannot convert type 'AmazonService.AWSECommerceServiceAPI.ImageSet[]' to 'AmazonService.AWSECommerceServiceAPI.ImageSet'
The solution is to download the WSDL to your workstation, open it in an editor (I recommend Notepad++) and then change line 584 from:
<xs:element name="ImageSets" minOccurs="0" maxOccurs="unbounded">
to:
<xs:element name="ImageSets" minOccurs="0" maxOccurs="1">
Now reference that file on your workstation rather than the original Amazon WSDL in the web service client proxy wizard. Once you've created the proxy project, run it to create the WCF client. The project will end up generating something like 11 different non-visual user objects. That's because the Amazon WSDL contains 11 different service binding, one for each of the country websites ( CA, CN, DE, ES, FR, IN, IT, JP, UK and US ). There is also a default one set to US. If you're in the US, keep the first one and delete the rest. If you're in a different country use the one that is for your country and delete the others.
 |
| Figure 6 - Amazon Web Service Bindings |
We need a data type to use to return the data from the proxy service. I created a custom non-visual user object called n_item and added the following as instance variables on that object:
string Title
string Author
string Publisher
string ISBN
string PublicationDate
string Price
string Author
string Publisher
string ISBN
string PublicationDate
string Price
I defined them all as strings because that's the data type that Amazon uses to return them. Note that I'm using a non-visual object rather than a structure here. That's because for purposes of returning data from a web service, non-visual object handle representations of nulls better than structures do.
Now go back to the non-visual object that was created by the WCF Service wizard. We want to create a function on that object that uses the WCF client to talk to Amazon and then returns the data to PowerBuilder Native. I've called the method of_search. For this example, I'm not passing any arguments. For the return, I've indicated that it will return an array of the n_item non-visual object I just defined. (One nice feature of PowerBuilder.Net is that is does support returning arrays from functions).
Now for some code. You'll need to adjust the following based on what namespace you used for your WCF proxy and WCF service. I used "wcfclient" for the client and "TeamSybase" for the service. I also renamed the non visual object created by the WCF client project to just "awsecommerceservice". The original name generated by the WCF client project was quite long.
string _accessKeyId = "XXXXXXXXXXXXXXXX"
string _secretKey = "YYYYYYYYYYYYYYY"
string _associatetag = "ZZZZZZZZZZZZZZZ"
string _responseGroup[]
wcfclient.ItemSearch _itemsearch
wcfclient.ItemSearchRequest _itemsearchrequest
wcfclient.ItemSearchRequest _isr[]
wcfclient.ItemSearchResponse _itemsearchresponse
TeamSybase.awsecommerceservice _client
System.Collections.IEnumerator _itemsenum
System.Collections.IEnumerator _itemenum
wcfclient.Item _item
wcfclient.Items _items
TeamSybase.n_item items[]
integer index = 1
// create a WCF Amazon ECS client
_client = create TeamSybase.awsecommerceservice
// Configure the client
_client.wcfConnectionObject.EndpointAddress.URL = "https://webservices.amazon.com/onca/soap?Service=AWSECommerceService"
_client.wcfConnectionObject.BasicHttpBinding.Security.SecurityMode = PBWCF.BasicHttpSecurityMode.TRANSPORT!
_client.wcfConnectionObject.BasicHttpBinding.MaxReceivedMessageSize = 1000000
// prepare an ItemSearch request
_itemsearchrequest = create wcfclient.ItemSearchRequest
_responseGroup[1] = "Medium"
_itemsearchrequest.SearchIndex = "Books"
_itemsearchrequest.Title = "PowerBuilder"
_itemsearchrequest.ResponseGroup = _responseGroup
_itemsearch = create wcfclient.ItemSearch
_isr[1] = _itemsearchrequest
_itemSearch.Request = _isr
_itemSearch.AWSAccessKeyId = _accessKeyId
_itemsearch.AssociateTag = _associatetag
_client.wcfConnectionObject.SoapMessageHeader.AddMessageHeaderItem(&
"AWSAccessKeyId",&
"http://security.amazonaws.com/doc/2007-01-01/",&
_accessKeyId,&
PBWCF.WCFHMAC.NONE!,&
"")
_client.wcfConnectionObject.SoapMessageHeader.AddMessageHeaderItem(&
"Signature",&
"http://security.amazonaws.com/doc/2007-01-01/",&
_secretKey,&
PBWCF.WCFHMAC.HMACSHA256!,&
"")
SetPointer ( HourGlass! )
Try
// issue the ItemSearch request
_itemsearchresponse = _client.ItemSearch(_itemsearch);
// write out the results
_itemsenum = _itemsearchresponse.Items.GetEnumerator()
do while _itemsenum.MoveNext()
_items = _itemsenum.Current
_itemenum = _items.Item.GetEnumerator()
do while _itemenum.MoveNext()
_item = _itemenum.Current
items[index] = create TeamSybase.n_item
items[index].Title = _item.ItemAttributes.Title
items[index].Author = _item.ItemAttributes.Author[1]
items[index].Publisher = _item.ItemAttributes.Publisher
items[index].ISBN = _item.ItemAttributes.ISBN
items[index].PublicationDate = _item.ItemAttributes.PublicationDate
if not IsNull ( _item.ItemAttributes.ListPrice ) then
items[index].Price = _item.ItemAttributes.ListPrice.FormattedPrice
end if
index = index + 1
loop
loop
catch ( System.Exception e )
items[1] = create TeamSybase.n_item
items[1].Title = e.Message
end try
return items
Note that I'm not providing you with an access key, secret key or associate tag for Amazon. You'll need to sign up with their web services program for the first two items and their associates program for the third. Once you've signed up with their web services program, you'll find the access key and secret key under Security Credentials:string _secretKey = "YYYYYYYYYYYYYYY"
string _associatetag = "ZZZZZZZZZZZZZZZ"
string _responseGroup[]
wcfclient.ItemSearch _itemsearch
wcfclient.ItemSearchRequest _itemsearchrequest
wcfclient.ItemSearchRequest _isr[]
wcfclient.ItemSearchResponse _itemsearchresponse
TeamSybase.awsecommerceservice _client
System.Collections.IEnumerator _itemsenum
System.Collections.IEnumerator _itemenum
wcfclient.Item _item
wcfclient.Items _items
TeamSybase.n_item items[]
integer index = 1
// create a WCF Amazon ECS client
_client = create TeamSybase.awsecommerceservice
// Configure the client
_client.wcfConnectionObject.EndpointAddress.URL = "https://webservices.amazon.com/onca/soap?Service=AWSECommerceService"
_client.wcfConnectionObject.BasicHttpBinding.Security.SecurityMode = PBWCF.BasicHttpSecurityMode.TRANSPORT!
_client.wcfConnectionObject.BasicHttpBinding.MaxReceivedMessageSize = 1000000
// prepare an ItemSearch request
_itemsearchrequest = create wcfclient.ItemSearchRequest
_responseGroup[1] = "Medium"
_itemsearchrequest.SearchIndex = "Books"
_itemsearchrequest.Title = "PowerBuilder"
_itemsearchrequest.ResponseGroup = _responseGroup
_itemsearch = create wcfclient.ItemSearch
_isr[1] = _itemsearchrequest
_itemSearch.Request = _isr
_itemSearch.AWSAccessKeyId = _accessKeyId
_itemsearch.AssociateTag = _associatetag
_client.wcfConnectionObject.SoapMessageHeader.AddMessageHeaderItem(&
"AWSAccessKeyId",&
"http://security.amazonaws.com/doc/2007-01-01/",&
_accessKeyId,&
PBWCF.WCFHMAC.NONE!,&
"")
_client.wcfConnectionObject.SoapMessageHeader.AddMessageHeaderItem(&
"Signature",&
"http://security.amazonaws.com/doc/2007-01-01/",&
_secretKey,&
PBWCF.WCFHMAC.HMACSHA256!,&
"")
SetPointer ( HourGlass! )
Try
// issue the ItemSearch request
_itemsearchresponse = _client.ItemSearch(_itemsearch);
// write out the results
_itemsenum = _itemsearchresponse.Items.GetEnumerator()
do while _itemsenum.MoveNext()
_items = _itemsenum.Current
_itemenum = _items.Item.GetEnumerator()
do while _itemenum.MoveNext()
_item = _itemenum.Current
items[index] = create TeamSybase.n_item
items[index].Title = _item.ItemAttributes.Title
items[index].Author = _item.ItemAttributes.Author[1]
items[index].Publisher = _item.ItemAttributes.Publisher
items[index].ISBN = _item.ItemAttributes.ISBN
items[index].PublicationDate = _item.ItemAttributes.PublicationDate
if not IsNull ( _item.ItemAttributes.ListPrice ) then
items[index].Price = _item.ItemAttributes.ListPrice.FormattedPrice
end if
index = index + 1
loop
loop
catch ( System.Exception e )
items[1] = create TeamSybase.n_item
items[1].Title = e.Message
end try
return items
 |
| Figure 7 - Amazon Web Services Management Console |
 |
| Figure 8 - Amazon Web Services Security Credentials |
You get the secret key when you generate the access key.
Your associate tag is located in the upper right hand corner of your Amazon Associates account page.
Ok, now to cover some of the differences between the code I used in 2012 and the code above.
As will be noted a bit later, I changed the ResponseGroup for the request form "Small" (2012) to "Medium" (today). That's because in 2012 I was just returning titles and today I want more information ( authors, publisher, publication date, etc) that required getting more data back in the service response. So much data in fact, that it exceeds the default size that WCF allows for the size of the message (65,536 bytes). I've increased the size significantly to allow for the additional data.
Your associate tag is located in the upper right hand corner of your Amazon Associates account page.
| Figure 9 - Amazon Associates Account Page |
Ok, now to cover some of the differences between the code I used in 2012 and the code above.
_client.wcfConnectionObject.BasicHttpBinding.MaxReceivedMessageSize = 1000000
As will be noted a bit later, I changed the ResponseGroup for the request form "Small" (2012) to "Medium" (today). That's because in 2012 I was just returning titles and today I want more information ( authors, publisher, publication date, etc) that required getting more data back in the service response. So much data in fact, that it exceeds the default size that WCF allows for the size of the message (65,536 bytes). I've increased the size significantly to allow for the additional data.
_responseGroup[1] = "Medium"
As just noted, in 2012 I used "Small" because I only wanted the titles. I'm using "Medium" now to get more data.
_itemsearch.AssociateTag = _associatetag
This is a result of changes that Amazon made since 2012. They now require that you provide them with an associates tag in every Product Advertising API web service request.
do while _itemenum.MoveNext()
_item = _itemenum.Current
items[index] = create TeamSybase.n_item
items[index].Title = _item.ItemAttributes.Title
items[index].Author = _item.ItemAttributes.Author[1]
items[index].Publisher = _item.ItemAttributes.Publisher
items[index].ISBN = _item.ItemAttributes.ISBN
items[index].PublicationDate = _item.ItemAttributes.PublicationDate
if not IsNull ( _item.ItemAttributes.ListPrice ) then
items[index].Price = _item.ItemAttributes.ListPrice.FormattedPrice
end if
index = index + 1
loop
Once again I'm returning more data in this example than I did in 2012, so we're using a type to collect the data and accessing more attributes. Because I'm trying to keep this simple, I'm only pulling the first author for a book if there are multiple authors.
Now that we've defined the method for our web service we need to go back to the web service project object that was created by the wizard. When the wizard was first run, there were no methods on the non-visual object and so there was nothing to expose in the service. Now we have a method to expose.
Now that we've defined the method for our web service we need to go back to the web service project object that was created by the wizard. When the wizard was first run, there were no methods on the non-visual object and so there was nothing to expose in the service. Now we have a method to expose.
 |
| Figure 10 - WCF Service Options |
So we need to check the checkbox in front of our new method so the project knows what to expose. I've also give the service an alias of "Search" that is a bit more web service friendly than "of_search". I should probably also alias the web service name as well, but haven't done so for this example. Nor have I changed the target namespace, which you should do for a production web service.
There's a few other things I've customized here, and you'll need to do the same. I'll explain what each of them is. Note for changes to the service attributes (that apply to all of the operations) you'll use the Service Attribute button to bring up that dialog to select those options, whereas for operations attributes (which only apply to specific methods of the service) you'll use the Operations Attribute button and it's resulting dialog.
Under Service Behavior attributes, I've enabled IncludeExceptionDetailInFaults. I've done that primarily for debugging purposes. Once you've got the web service working and want to move it to production you'll want to turn that off.
I've also checked the XmlSerializerFormat option. By default, WCF services use the DataContractSerializer. ASP.Net web services (what PowerBuilder Native uses for web services) uses the XmlSerializerFormat and can't properly handle the response from the DataContractSerializer. The XMLSerializerFormat option in WCF allows us to create a WCF service that uses a serializer that older technology clients like PowerBuilder Native can understand.
Under Operation Attributes, the OperationContract Name attribute is set for us by the project when we alias the name of the method. What I've done in addition to that is set the STAOperationalBehavior attribute. That forces the method to be invoked under a single threaded apartment (STA) threads. By default, WCF uses multi-threaded apartment (MTA) threads.
The only reason we need to do this is that, for reasons I'm not clear on, PowerBuilder.Net includes references to WPF classes when you create a web service proxy. Since WPF is UI technology, if you don't select this options you'll get a .Net exception that indicates:
That's because .Net notices the references to WPF classes in the project. It may be possible to remove those references, but I haven't attempted that yet. Of course, if you're using Visual Studio.Net to create the proxy WCF web service you shouldn't have this issue because Visual Studio .Net won't create such references.
Do a full build on the WCF Service. Once you've done that, you can go back into the WCF Service project, go to the Run tab, and point the "Application" property to the wcfservice_host.exe file that got deployed with the build.
There's a few other things I've customized here, and you'll need to do the same. I'll explain what each of them is. Note for changes to the service attributes (that apply to all of the operations) you'll use the Service Attribute button to bring up that dialog to select those options, whereas for operations attributes (which only apply to specific methods of the service) you'll use the Operations Attribute button and it's resulting dialog.
Under Service Behavior attributes, I've enabled IncludeExceptionDetailInFaults. I've done that primarily for debugging purposes. Once you've got the web service working and want to move it to production you'll want to turn that off.
 |
| Figure 11 - WCF Service Behavior Attributes Dialog |
I've also checked the XmlSerializerFormat option. By default, WCF services use the DataContractSerializer. ASP.Net web services (what PowerBuilder Native uses for web services) uses the XmlSerializerFormat and can't properly handle the response from the DataContractSerializer. The XMLSerializerFormat option in WCF allows us to create a WCF service that uses a serializer that older technology clients like PowerBuilder Native can understand.
Under Operation Attributes, the OperationContract Name attribute is set for us by the project when we alias the name of the method. What I've done in addition to that is set the STAOperationalBehavior attribute. That forces the method to be invoked under a single threaded apartment (STA) threads. By default, WCF uses multi-threaded apartment (MTA) threads.
 |
| Figure 12 - WCF Operations Behavior Attributes Dialog |
The only reason we need to do this is that, for reasons I'm not clear on, PowerBuilder.Net includes references to WPF classes when you create a web service proxy. Since WPF is UI technology, if you don't select this options you'll get a .Net exception that indicates:
The calling thread must be STA, because many UI components require this.
That's because .Net notices the references to WPF classes in the project. It may be possible to remove those references, but I haven't attempted that yet. Of course, if you're using Visual Studio.Net to create the proxy WCF web service you shouldn't have this issue because Visual Studio .Net won't create such references.
Do a full build on the WCF Service. Once you've done that, you can go back into the WCF Service project, go to the Run tab, and point the "Application" property to the wcfservice_host.exe file that got deployed with the build.
 |
| Figure 13 - WCF Service Run Options |
Once you've done that you can then right click on the WCF Service project and select "Run" whenever you want to run the service. It will run in a command prompt window.
 |
| Figure 14 - WCF Service Running Self Hosted |
We're now ready to test the service. I'm going to use SOAPUI (the open source version) for that, both because it makes generating a "client" for the new service very easy and because it will show us any exceptions being thrown by the service.
Create a new project in SOAPUI, select Add WSDL, and then copy the WSDL information from the WCF service project into the WSDL Location prompt in SOAPUI:
Create a new project in SOAPUI, select Add WSDL, and then copy the WSDL information from the WCF service project into the WSDL Location prompt in SOAPUI:
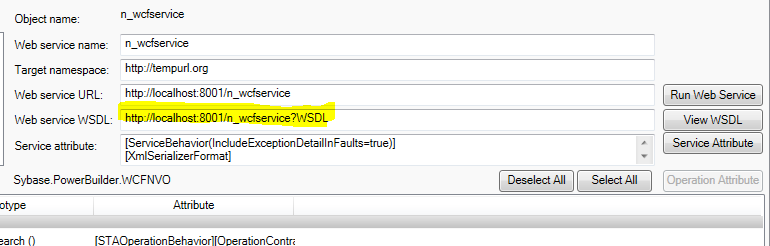 |
| Figure 15 - WCF Service WSDL Location |
 |
| Figure 16 - SOAPUI Add WSDL Dialog |
SOAPUI will create a sample request for you automatically. Run that, and you should get data back:
 |
| Figure 17 - SOAPUI Calling WCF Service |
If not, resolve the errors shown from the returned exception. Assuming all is good, it's time to use this from PowerBuilder Native.
Create a new workspace and a new target of type application in PowerBuilder Native. Create a new window (lets say w_main). Add the following to the open event of the application:
Open ( w_main )
That's the bare minimum of a PowerBuilder Native application. Now lets create a Grid Datawindow that uses our new proxy web service.
After you've selected New -> DataWindow -> Grid, select web service as the source.
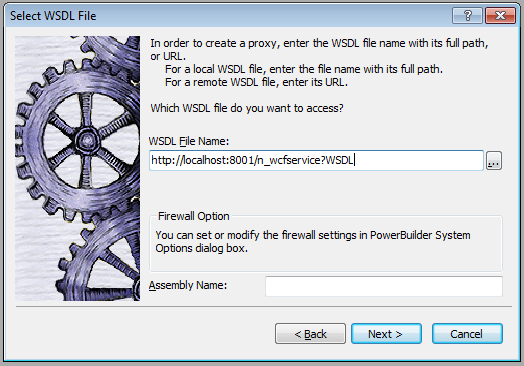
On the next page in the wizard, enter the same value for the WSDL that you gave SOAPUI earlier.
On the next page, there should only be one service, select it.
Now you need to select the method you want to call. Choose the Search method (or whatever you called it).
On the next page you'll need to select what data the datawindow is going to show. In this case there's only one option, the result set from the service. Select it and hit Next.
After you've selected New -> DataWindow -> Grid, select web service as the source.
 |
| Figure 18 - New Web Service Based DataWindow |
On the next page in the wizard, enter the same value for the WSDL that you gave SOAPUI earlier.
 |
| Figure 19 - Web Service DataWindow Service URL Dialog |
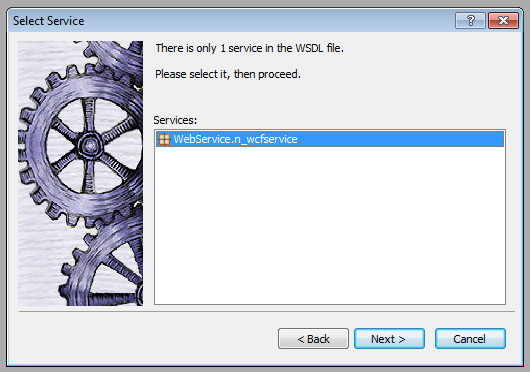
On the next page, there should only be one service, select it.
 |
| Figure 20 - Web Service DataWindow Service Selection |
Now you need to select the method you want to call. Choose the Search method (or whatever you called it).
 |
| Figure 21 - Web Service DataWindow Method Selection |
On the next page you'll need to select what data the datawindow is going to show. In this case there's only one option, the result set from the service. Select it and hit Next.
 |
| Figure 22 - Web Service DataWindow Data Selection |
Continue through the remainder of the wizard and PowerBuilder will create the DataWindow for you. You can preview it and it should display the data we saw in SOAPUI.
Drop that new datawindow onto the w_main window. Just to make things simple we're only going to add two more lines of code. In the open event of the window add this:
And in the resize event of the window add this:
We're done. Run the app and you should see the data being returned from the Amazon web services into our PowerBuilder Native application.
dw_1.Retrieve()
And in the resize event of the window add this:
dw_1.Resize ( newwidth - 100, newheight - 100 )
We're done. Run the app and you should see the data being returned from the Amazon web services into our PowerBuilder Native application.
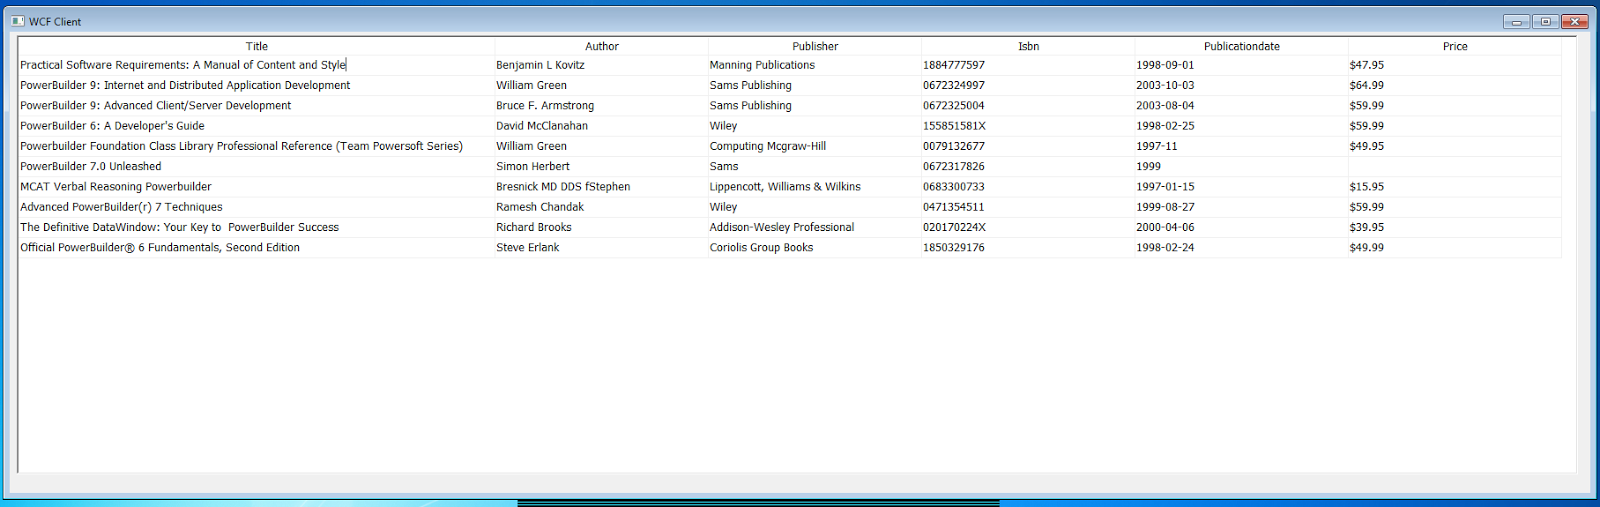 |
| Figure 23 - PowerBuilder Native Consuming Amazon Web Service |
9 comments:
How about Bruce?
I want to consume a web service that returns me nested structures:
Structure A (string A1, string A2, structure B)
Structure B (string B1, structure C)
Structure C (string C1, string C2, string Cxml)
I only get A1 and A2, and structure B has no register, so structure C has no regress either.
I've tried the web service with java and alli if it returns all structures with values.
Consumption of web service with PB 11.5 if executed well. It is SOAP 1.1, in PB when implementing the web service are created: the service and 4 OBJECTS NOT VISUAL (these are the structures that I mention)
Please, your help so that you can receive the structure of the web service.
Thank you
All of the PowerBuilder Classic web service client implementations are based off of ASP.Net web services, which is a very old technology. That's why you need to do something, like create a WCF client and then call it through CCW or as a proxy web service, in order to reach it from PowerBuilder Classic. Hopefully Appeon will update the Classic web service client technology to a more recent one.
I installed PB 12.6 on a laptop with Windows 10 64bits, in addition I installed the Windows SDK .Net Framework. I did a "wcf client" but it does not allow me to list the services I get the following error:
-------- List WCF services and data classes --------
BUG: Windows SDK for .NET Framework 4.0 or higher must be installed.
Correct errors and resubmit.
-------- List of WCF services and data classes complete --------
I then describe the contents of the PATH system variable so I can see what I have installed
C: \ app \ racer \ product \ 11.2.0 \ dbhome_1 \ bin;
C: \ oracle \ app \ oracle \ product \ 11.2.0 \ server \ bin;
C: \ Program Files (x86) \ Intel \ iCLS Client \;
C: \ Program Files \ Intel \ iCLS Client \;
% SystemRoot% \ system32;
% SystemRoot%;
% SystemRoot% \ System32 \ Wbem;
% SYSTEMROOT% \ System32 \ WindowsPowerShell \ v1.0 \;
C: \ Program Files (x86) \ SQL Anywhere 11 \ bin64;
C: \ Program Files (x86) \ SQL Anywhere 11 \ bin32;
C: \ Program Files (x86) \ Sybase \ Shared \ PowerBuilder;
C: \ Program Files (x86) \ Sybase \ PowerBuilder 12.6;
C: \ Program Files (x86) \ Sybase \ Shared \ PowerBuilder \ x64;
C: \ Program Files (x86) \ Windows Kits \ 10 \ Windows Performance Toolkit \;
C: \ Program Files (x86) \ Microsoft SDKs \ Windows \ v10.0A \ bin;
C: \ Program Files (x86) \ Microsoft SDKs \ Windows \ v10.0A \ bin \ NETFX 4.6.2 Tools;
C: \ WINDOWS \ Microsoft.NET \ Framework \ v4.0.30319;
C: \ Windows \ Microsoft.NET \ Framework \ v2.0.50727;
C: \ oraclexe \ instantclient_11_2;
C: \ Program Files (x86) \ Skype \ Phone \;
C: \ Program Files \ Microsoft SQL Server \ Client SDK \ ODBC \ 110 \ Tools \ Binn \;
C: \ Program Files (x86) \ Microsoft SQL Server \ 120 \ Tools \ Binn \;
C: \ Program Files \ Microsoft SQL Server \ 120 \ Tools \ Binn \;
C: \ Program Files \ Microsoft SQL Server \ 120 \ DTS \ Binn \;
C: \ Program Files (x86) \ Microsoft SQL Server \ 120 \ Tools \ Binn \ ManagementStudio \;
C: \ Program Files (x86) \ Microsoft SQL Server \ 120 \ DTS \ Binn \;
C: \ Program Files (x86) \ ATI Technologies \ ATI.ACE \ Core-Static;
C: \ Program Files \ Intel \ Intel (R) Management Engine Components \ DAL;
C: \ Program Files \ Intel \ Intel (R) Management Engine Components \ IPT;
C: \ Program Files (x86) \ Intel \ Intel (R) Management Engine Components \ DAL;
C: \ Program Files (x86) \ Intel \ Intel (R) Management Engine Components \ IPT;
C: \ Program Files \ SQL Anywhere 16 \ bin64;
C: \ Program Files \ SQL Anywhere 16 \ bin32
I also did what the following link says
Https://apps.support.sap.com/sap/support/knowledge/preview/en/2421171
And installed the .Net Framework 4.5 runtime
Please, your help to be able to consume a web service from pb 12.6
Thank you very much
It may be looking specifically for 4.0 and you've got a later version installed (looks like perhaps 4.6)
You might try installing this specific version:
https://www.microsoft.com/en-us/download/details.aspx?id=8279
Note: because of comment spam, comments on this blog are moderated and won't appear until I approve them. If you make a comment, just wait a while and I'll approve it.
Bruce, what happens when you try to import an WSDL file and it throws a message like "Unknown exception found"? Is it matter of the WSDL or PB?
Run the .Net SDK WSDL utility directly on the WSDL file. If it throws errors, then the WSDL is the problem. If it works fine, then PowerBuilder is the problem.
Bruce, I did like you said and I got this: Cannot convert type 'System.Xml.XmlElement' to 'System.Web.Services.Description.ServiceDescriptionFormatExtension'
It's still WSDL problem, isn't it? What else can I do?
Thanks!
Take a look at:
https://stackoverflow.com/questions/419547/net-wsdl-command-line-utility-error
Unfortunately, I believe that means that PB Classic isn't going to be able to create a proxy for it. No way I know of to specify the Soap12 option when it creates the proxy.
Using .Net Engine and hacking the internal call to "wsdl.exe", PB was able to create objects/proxies described in SOAP12 WSDL. Steps I made:
Renamed original "wsdl.exe" to "wsdl.original.exe".
Created a PB app and named it "wsdl.exe". This app basically gets the commandline and append " /protocol:SOAP12 " to the list of parameters and then call "wsdl.original.exe" passing the new commandline, this call must be synchronous so use "WScript.Shell", sample dirty code (open event):
// pb code start
OleObject wsh
string ls_call
wsh = CREATE OleObject
wsh.ConnectToNewObject( "WScript.Shell" )
ls_call = '"C:\Program Files\Microsoft SDKs\Windows\v7.1\Bin\NETFX 4.0 Tools\wsdl.original.exe"' + ' /protocol:SOAP12 ' + commandline
wsh.Run(ls_call , 1, TRUE)
// pb code end
With this hack PB will end up detecting/creating most proxies and objects descriptions. I haven't tested any of these proxies yet, as I'm stuck with WS-Sec issues, but I think it should work.
Post a Comment