Setting up Git
For this demo, we're going to use Bonobo Git Server. One reason I like it is because it provide a web based admin console for managing the server, so I don't have to use the Git command line to do that.Because it's an ASP.Net application, the machine where we're going to install it must have IIS and the .Net Framework 4.6 installed on it. To install Bonobo Git once you've downloaded it you simply need to:
- Copy the main folder from the unzipped download into the wwwroot folder for IIS
- Give the IIS User modify and write permissions to the App_Data folder of the app
- Convert the folder into an Application in IIS Manager
- Ensure that the app pool that the application uses is based on .Net 4.0 rather than 2.0
Also, because the PowerBuilder IDE currently doesn't support a full set of the Git options (e.g., show log, repo browser, etc.) I'm going to install TortoiseGit in order to use those features. As before, we could use the git command line client to do this, but I prefer having the options available to me through a GUI, in this case Windows Explorer. TortoiseGit is dependant on Git For Windows, and you'll be prompted to install as well it during the install.
Creating a Repository
Open the admin console (http://localhost/Bonobo.Git.Server) as the admin user (default password "admin") and click the Repositories link at the top of the page. From there, hit the "Create New Repository" button.
The only thing you need to provide to create the repository is a name. Enter that and then click the Create button on the bottom of the page.

Now click on the Users link at the top of the page. You'll want to create at least one user id. I'm creating two because I'm going to be demonstrating what happens when two different developers edit the same object at about the same time.
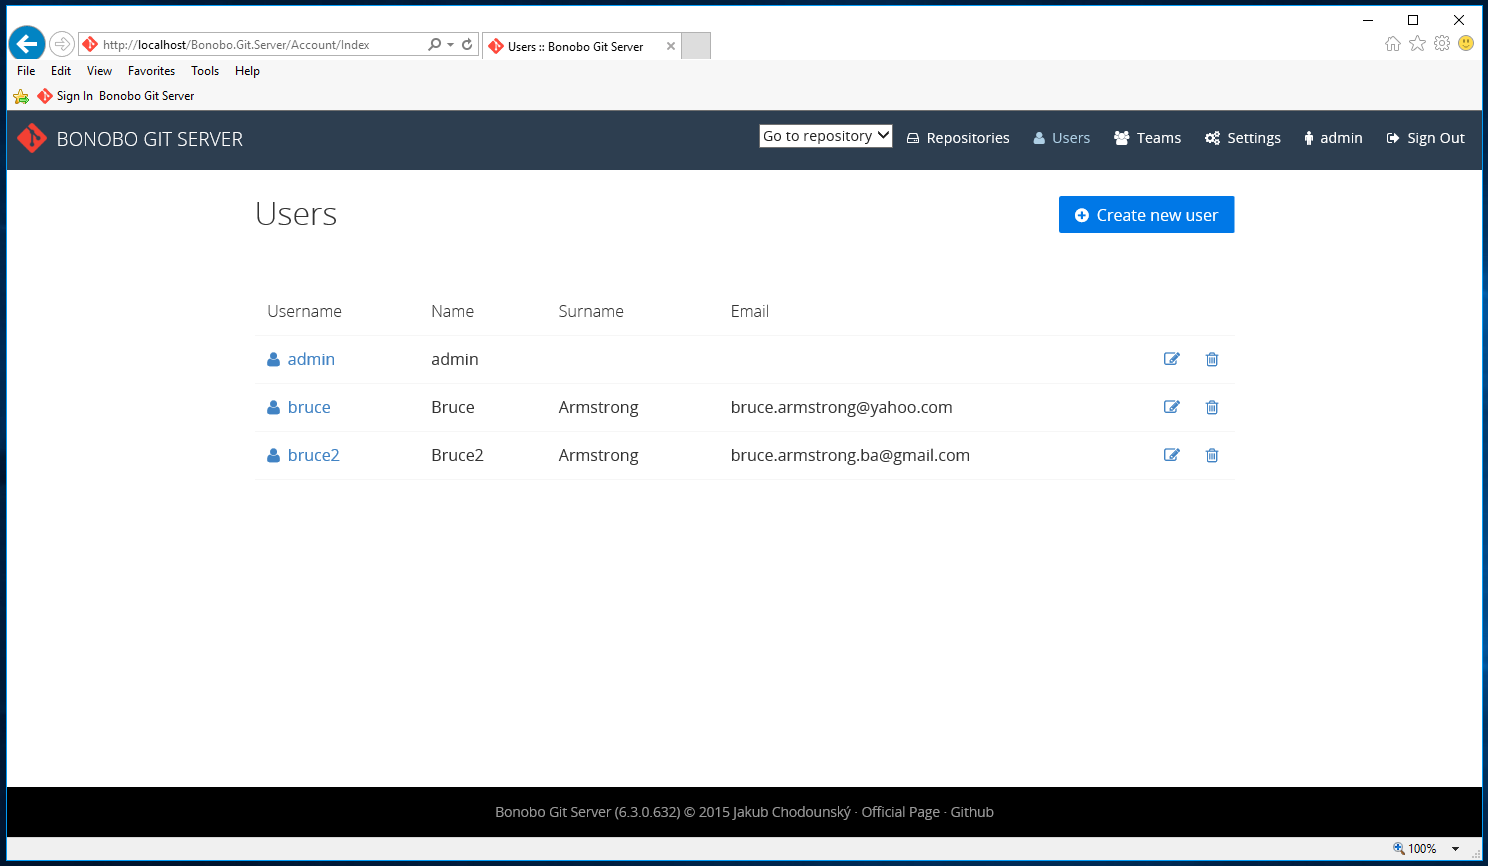
I'm going to go back to the repository now, edit it and add the two users I created as contributors for the repository.

Click on the Repositories link again. To the right of the repository name is a set of icons, the first one of which will copy the URL for the repository to the clipboard. We're going to need that later.

Add the PowerBuilder Project to a Git Repository
As mentioned in the Subversion article, the way we connect to Subversion and Git is different than how we used to do it using the MSSCCI interface. Instead of going to the Source Control tab on the Workspace Properties window, we're going to right click on the Workspace and select the new Add to Source Control option.

The next dialog that PowerBuilder displays asks for the name and email address you want to use while committing your changes to Git.

The next dialog shows us the objects that will be added in the initial commit. As pointed out in the Subversion article, this includes the workspace file, the PBLs, and the source code that has been exported into PBL based folders under the ws_object folder under the workspace.

After we click OK here, the output pane will show the status of the add to source control.

At this point if you haven't used Git before you might be wondering why we never specified any information about the Git server. That's because Git is a distributed source control system. If you go back and look at the last dialog that appeared you'll notice that at the top it says "Create local working repository...". That's all we've done so far. The Git server we set up, even though it's running on the same machine in this demo, is the remote repository. This diagram can help explain what is going on:
 |
| Image: Dirk Dunn |
In a distributed source control system, you have a local repository and the commits are done against that. At some point you then "push" your changes to the remote repository and "pull" down changes that have been made by other developers. Other developers can't see the changes you've committed, only the changes that you have pushed to the remote repository.
So, right click on the workspace again and select the Git Push option that is now available.

This is the dialog that appears when you do that the first time, so you can configure the remote repository.

An here's where we're going to run into an issue. Normally the URL for a Git repository is in this format:
https://<servername>/<repositoryname>.git
What the folks that designed this dialog expected you to do is name the repository name the same as your workspace name. And so now you would populate the portion of the dialog next to "Repository URL" with the the portion of the repository of the URL up through the server name. That would result in a repository URL in the form of:
https://<servername>/<workspacename>
If the repository you create and the workspace have the same name, you should end up with the URL of the repository you just created. There's on minor issue though. Note that the URL that gets formed through the dialog is missing the .git extension. Many Git repositories (e.g., GitHub, GitLab, Perforce HelixTeamHub ) don't care and you'll be able to do the push once you've filled the dialog. However, Bonobo does care, and you'll get an "Invalid URL" error if you attempt to push to that. The one other server I found that also had issues with that is Team Foundation Server. In addition to Team Server Version Control, Team Foundation Server also support Git. Never fear though, if you want to use either Bonobo or Team Foundation Server there is a workaround.
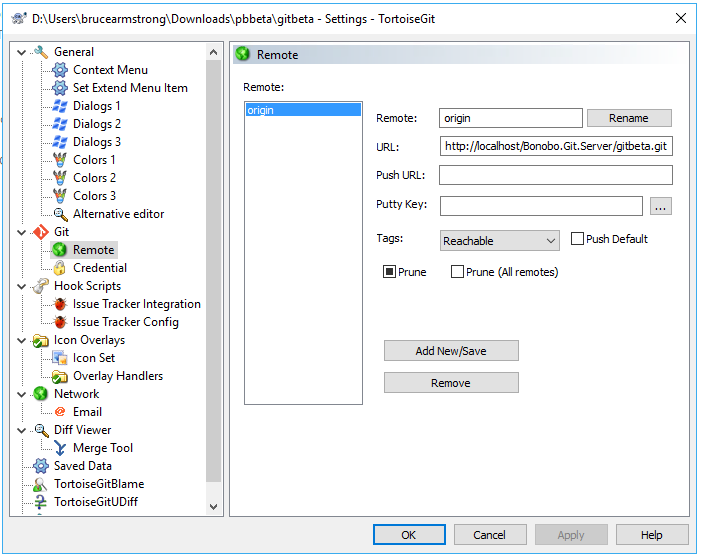
All that dialog is going to do is set the remote repository for the local repository. We don't have to do that through PowerBuilder. As mentioned earlier, I've installed TortoiseGit. So I'm going to use that instead to configure the local repository to work with the remote repository. Fine the workspace folder in Windows Explorer, right click on it, and select TortoiseGit -> Settings from the popup menu.

You'll get a notice from TortoiseGit about hierarchical configuration, just press OK.

In the Settings dialog, look for Git->Remote. Enter the URL in that page of the settings and hit OK.
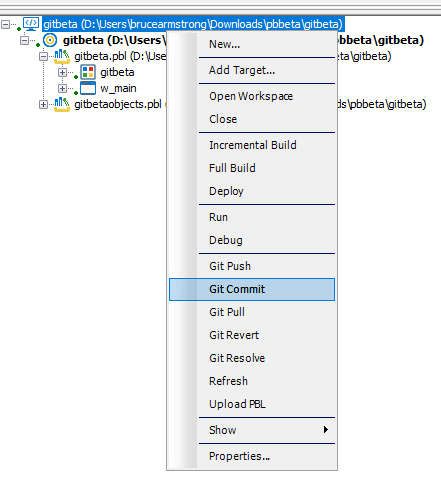
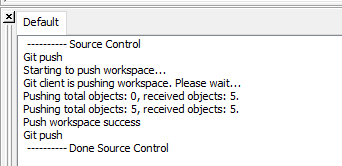
Go back into PowerBuilder now and select Git Push again. This time we get no dialog, and the push works.

As with Subversion, what we can see if we use the repository browser is that when Git is used as source control PowerBuilder creates a ws_objects folder with the exported source code in it. In that folder there are subfolders for each PBL, so we no longer have to put our original PBLs in seperate folders (as we used to do with MSSCCI to avoid object name conflicts). And we'll see that PowerBuilder has also checked in the PBLs and the PBW file, something it doesn't do under MSSCCI.

The reason it's done that is to make it easier for another developer to do a "checkout" from source control and end up with something they can start using right away. Previously under MSSCCI, only the raw source code was in version control, and a developer would need to get a copy of the PBLs from another developer or create them by importing the raw source code before they start working on the app. We're going to look at that change now:
Download the Repository into a New Workspace
Let's close the current workspace and then with no workspace in the IDE select the new "Connect to Workspace" option that is available.
Once again we're presented with that dialog in which we can put the Git Repository URL, and once again it's not going to work when we're using Bonobo. Fortunately, once again there's a workaround.

Go back into TortoiseGit, right click on the parent directory under which you want to put the directory that will contain the PowerBuilder workspace. Right click on it and then select "Git Clone..." from the popup menu.

In the Tortoise Git dialog that appears, provide the Git repository UR and hit OK.

You'll see a dialog like the following showing the status of the clone.

The great thing is that since the clone brought down the PBW and PBT files and the PBLs, we can go back into PowerBuilder and do an Open Workspace on the PBW file. PowerBuilder doesn't know anything about the workspace being in Git yet though, so right click on the workspace and select "Add to Source Control" again as we did when we first registered it. Also, use TortoiseGit again on the local repository to make sure that the remote is still set the the Git server.
Making Source Code Changes
As with Subversion, PowerBuilder behaves a bit differently with Git for source control than when we were using MSSCCI. If you open a file and edit it, it appears in the system tree with a check mark on it. Unlike MSSCCI, that doesn't mean that the file has been locked in source control, it just means it's changed and will be affected by the next commit.Let's make two different changes in the two different workspaces in the same object and see what happens as a result. I'm going to change the title of the window in one workspace. I'm going into the second workspace and change the background color. Now I commit in that workspace.


Now I go back to the first workspace and commit there as well. Now if you open up the object in either workspace you'll notice the only changes you see are the ones you made in that workspace. Once again, if you're not familiar with Git, you might wonder what went wrong. If you refer back to that Git diagram above, you see that a commit only affects the local repository. Right now the Git server doesn't know about either change.
So, in that first workspace, lets do another Git Push.
Now go to the second workspace and try to do another Git Push. You'll receive an error like this:

That's Git's way of telling you that another user pushed a change to the object since you last did a pull from the server. What we need to do is pull down and merge their changes with our work. So do a Git Pull.

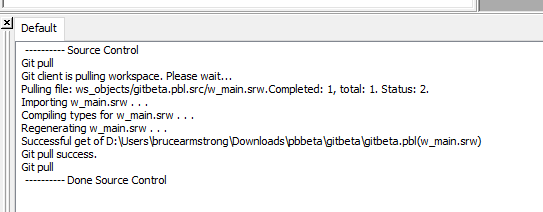
Fortunately, Git was able to merge the changes from the first workspace with this one. So now we can attempt our Git Push again, and this time it works.

That was too easy. Let's try something else and see if we can force a merge conflict.
- I created three object functions on the window with some sample code in them. ( of_a, of_b and of_g ).
- I pushed that to the git repository and then pulled that into the second workspace so they were both in sync.
- In one workspace I added another function ( of_f ) and committed that.
- In the other workspace and deleted the of_b function and committed that.
- I pushed one workspace to the Git repository.
- I attempted to push the second workspace and got the "not fast-forwardable" error.
- I pulled from the second workspace and the merge was performed.
- I opened the object in the second workspace and sure enough, it had methods of_a, of_f and of_g.
I'm impressed. That same operation caused huge problems with Subversion. Not only did it result in a merge conflict, but a merge conflict that would be difficult to solve using the standard Edit Conflict tools. That's a good thing, because for the most part Git doesn't offer the ability to lock files to prevent merge conflicts that Subversion does, which is the main way we prevent merge conflicts in Subversion.
4 comments:
Hi Bruce, there is a question i have:
Let's imagine the following scenario:
1. I create a new branch (feature_X) and switch to the develop branch.
2. I make a change ... git notices that two files have changed:
Once the x2.pbl file and once the source file from ws_objects. I commit this change.
3. I switch back to the develop branch. There I make a change in the same place and elsewhere ... git notices again that two files have changed. the x2.pbl and the source file located in ws_objects.
Now, the changes from feature_X branch to merge into the develop branch. As expected, we get a merge conflict. There are two files in conflict:
1. the x2.pbl and 2. the source file (from ws_objects).
the source file can be merged after a manually adjust, but how do I deal with the x2.pbl? Since this is a binary file I can either choose between the x2.pbl from the develop branch or the x2.pbl from feature_X.
If I select the x2.pbl from feature_X, the changes I made later in develop are gone. If I select the x2.pbl from develop, the changes from the feature_x branch will be lost.
what am I doing wrong here? Surely there is a possibility that I will regenerate the .pbl after I have adapted the source file from the ws_object folder? Should not this happen automatically?
How do I get Powerbuilder configured to regenerate the x2.pbl as soon as the source file is changed from ws_objects?
BTW: i am using source tree to work with branches,
Hi Bruce, first-timer here, great how-to. I have a more basic initial problem, which can be found at the below sub-heading:
That will bring up the "Add to Source Control" dialog, from which we can select Git.
After setting up GIT, there is no 'Git' option in the 'Add to Source Control' interface dropdown. From recent experience trying to get TFS/Vis Studio option to show up in that dropdown, our system guy had to reinstall Vis STudio (i.e. the 3rd party tool, not Powerbuilder) with the right drivers selected to get TFS to finally show up in the dropdown. I'm thinking that GIT has to have the same thing somehow, can you fill us in on what it takes to get that Git option to show up there? Thanks.
After using TortiseGit, and adding the setting, I go back to PB 2017 R3 and do a Git Push and get an error 'Git client error code: Generic error.' I've look thru the appeon developer community and didn't see anything that would help me. Do you have suggestion on how to correct this?
The only thing PowerBuilder uses TortoiseGit for is to view difs and the commit log. Was it working before you updated the setting?
I don't review the comments on the blog very regularly. You would be better off posting a question in the Appeon forums.
Post a Comment