What the Desktop App Converter does is create a UWP wrapper around a .Net or Win32 application. It runs the application within an isolated Windows environment so that any elevated privileges only affect the isolated environment and not the host machine.
Prerequisites
In order to use it you'll need a machine running Windows 10 Pro or Enterprise. It will not work on a VirtualBox virtual machine as it is essentially runs as a virtual server to profile your application and needs the VT-x/AMD-V flags (Hardware-assisted virtualization) available to it (which VirtualBox doesn't support). Apparently you may be able to run it on a virtual machine under VMWare.
So, as indicated above, the machine (or virtual machine) that you're running converter on has to have hardware-assisted virtualization. It also has to support Second Level Address Translation (SLAT), another feature designed to support virtualization.
Currently, you'll also have to ensure that the Windows 10 environment you're running it on is 64 bit, and the Application Package (appx) it creates can only run the 64 bit version of Windows 10. Hopefully that limitation will be removed later.
Also note that although regular UWP apps can run on a number of devices (phones, tablets, desktop computers, game machines, etc.) the converter creates appx files that only targets desktop computers.
The Windows 10 machine does not have to be the machine that you do your PowerBuilder development on. In fact, I used a Windows 7 machine for PowerBuilder development when I prepared this example. You only need Windows 10 for running the converter.
You also need to be on the Anniversary or a recent Insider edition of Windows 10. However, fear not, as if you attempt to install it on an earlier version you'll be redirected to a website where you can download the update.
You'll need to download a Desktop App Converter Base Image that matches the version of Windows 10 that you're running the converter on. For example, I'm running the Anniversary edition (10.0.14393.0) so I downloaded BaseImage-14393.wim.
You'll also need to install the Windows 10 SDK on the machine where you'll be running the converter.
Installing the Converter
Installing the converter is simple, just access the Store on the Windows 10 machine, search for Desktop App Converter, and then click the "Get" button (or follow the instructions if it prompts you to upgrade first). You should see something like this, except that mine says "Launch" because I've already got it installed.

Preparing your Application
The converter doesn't actually analyze your application directly. What it looks at is the installer you use to install it on a desktop. So to use the converter what you'll need to do is create an install file. For this example, I'm using Inno Setup to create the installer. Because I'm more comfortable using an GUI than scripting it, I'm also using Inno Script Studio to generate the script.

In order for the converter to properly analyze the install, the installer has to run be able to run silently. That is, it can't stop and prompt the user for a response because the converter has no ability to respond to such prompts. For many setup files you can pass arguments to the installer (e.g., /quiet, /silent), and the converter supports that through a InstallerArguments options. However, what I did was use Silent Install Builder to wrap the Inno Setup generated setup file so that it's always silent.


Running the Converter
You may be surprised (at least I was) that the converter turns out to be a command line utility. Make sure that when you run it, you right click on the icon in the Start panel and choose "Run as Administrator".

You'll be dropped into a PowerShell command window. Or it will attempt to do that. Windows comes pre-configured to limit the ability to run PowerShell. You may have to use Set-ExecutionPolicy to configure your system to allow the converter to operate. See "Changing the PowerShell ExecutionPolicy setting" in this ThinkGeek article for instructions on how to do that if needed.
Once the converter PowerShell command window is running it will provide you with the two instructions you need to know.

The first thing you'll need to do is prepare the converter environment using that base image you downloaded earlier. So, for example, you might enter:
Once the converter PowerShell command window is running it will provide you with the two instructions you need to know.

The first thing you'll need to do is prepare the converter environment using that base image you downloaded earlier. So, for example, you might enter:
DesktopAppConverter.exe -Setup -BaseImage BaseImage-14393.wim
The second thing you'll be entering is the instructions that actually starts the converter process.
For demonstration purposes we're going to add one more command line option to that: -Sign. That option tells the converter to self-sign the appx file. In actual use you'll need to use a code signing certificate and the SignTool utility from the Windows SDK to sign the appx file. Instructions for doing so are on the Microsoft site. Note that if you don't already have a code signing certificate, you can usually get discounted Comodo code signing certificates from one of their resellers. Code signing certificates are also available from other vendors (DigiCert, Symantec, GoDaddy, Thawte, GlobalSign, etc.) but they are generally more expensive.

Click on the self-signed certificate and then click "Details".

In the Details window, click "View Certificate"
And in the Certificate window, click "Install Certificate..." In the Certificate Import Wizard that appears, select "Local Machine" and then click "Next" to get to the "Certificate Store" page. In that page select "Place all certificates in the following store" and then click the "Browse..." button.

In the Select Certificate Store window, select the "Trusted Root Certificate Authorities" option and then click the "OK" button.

Click "Next" and then "Finish".
We're now ready to run the appx file. Simply double click it in File Explorer. You should see something like this:

That means you're ready to go. Go ahead and install the application and run it just to make sure everything is working.
DesktopAppConverter.exe -Installer <Install exe or msi> -Destination <Output Directory> -PackageName "<Name of Package>" -Publisher "CN=<publisher_name>" -Version 1.0.0.0 -MakeAppx
For demonstration purposes we're going to add one more command line option to that: -Sign. That option tells the converter to self-sign the appx file. In actual use you'll need to use a code signing certificate and the SignTool utility from the Windows SDK to sign the appx file. Instructions for doing so are on the Microsoft site. Note that if you don't already have a code signing certificate, you can usually get discounted Comodo code signing certificates from one of their resellers. Code signing certificates are also available from other vendors (DigiCert, Symantec, GoDaddy, Thawte, GlobalSign, etc.) but they are generally more expensive.
Running the Application Package
If we self-signed the appx, and only in that case, we need to tell Windows to trust the self-signed certificate. You should not need to do this with any other appx files. Right click on the appx file that was generated, select "Properties" from the popup menu and then click the "Digital Signatures" tab.
Click on the self-signed certificate and then click "Details".

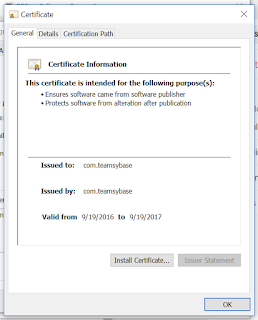
In the Details window, click "View Certificate"

And in the Certificate window, click "Install Certificate..." In the Certificate Import Wizard that appears, select "Local Machine" and then click "Next" to get to the "Certificate Store" page. In that page select "Place all certificates in the following store" and then click the "Browse..." button.

In the Select Certificate Store window, select the "Trusted Root Certificate Authorities" option and then click the "OK" button.

Click "Next" and then "Finish".
We're now ready to run the appx file. Simply double click it in File Explorer. You should see something like this:

That means you're ready to go. Go ahead and install the application and run it just to make sure everything is working.
No comments:
Post a Comment