OData
One of the new features added to PowerBuilder Native with the 12.6 release was support for accessing SQL databases through OData. A number of database vendors, particularly SAP and Microsoft provide build in support for exposing their databases via OData. However, what do you need to do if you want to access other databases such as IBM or Oracle?There are a number of options. One is to get something like the Progress DataDirect OData Connector or the CData Could Driver. Another approach, recommended by IBM and Oracle, is to expose the database through WCF Data Services using Visual Studio.Net. The problem with that approach is that Microsoft (as it often does) has indicated that WCF Data Services has been deprecated in favor of Web API OData libraries. So instead, we're going to look at a third option, using platform neutral open-source tools to expose any database through an OData service.
First though we might want to review why we would want to access a database through OData. There are two main reasons:
1. No need to install a database driver on the client machine.
2. No need to open up non-standard ports in the firewall in order to reach databases in the cloud.
To understand why that is, we should also briefly review what OData is. OData is based on REST web services. REST web services are an implementation of web services that uses standard HTTP methods (primarily GET, PUT, POST and DELETE) to URLs on standard HTTP ports and transmits data via standard Internet media types (primarily JSON). Unlike SOAP web services, there is no standard for REST services, it's just a protocol.
What OData does is standardize the way such REST web services are used, in particular to provide support for the standard database CRUD operations (create, retrieve, update, delete). As a result of this standardization, any OData client can access any OData data source. It's like ODBC for cloud databases.
Downloading Needed Resources
For today's sample I'm going to use Oracle as the database we want to connect to from PowerBuilder 12.6 Native through OData. I'm assuming that you're going to be walking through the sample, performing the same actions in order to create a service of your own, so I'm going to provide you with the download links for all the tools you'll need.The first thing we're going to need to get that done is a copy of Eclipse. When I started working on this sample, the most recent version was Mars. Sometime thereafter (June of 2016) Eclipse release the Neon version. It really shouldn't matter which version you use, but the screenshots you'll see in this article will be from the Mars version. Make sure you get the "Elipse IDE for Java EE Developers". And if you're working on a 64 bit operating system I would recommend getting the 64 bit version. Not required, but it should perform better than the 32 bit version.
Eclipse Mars
Eclipse Neon
Eclipse will need a Java JDK to work against. If you don't have one installed, or if you have a 32 bit version installed but are going to use a 64 bit version of Eclipse and need a 64 bit version JDK, you can download it from the Oracle Java site. I used what was then (and is still at the time of this writing) the latest, version 8.
Oracle Java JDK 8
When we're done writing this OData service we're going to need a web service to deploy and run it on. For the purposes of this sample I'm going to use Apache Tomcat. Once again, when I started working on the sample the latest and greatest version was 8.0. And, once again, by the time I wrote this article a newer version had been released (8.5 in June of 2016). Either should work for you, but the sample I'm showing uses 8.0.
Apache Tomcat 8.0
Apache Tomcat 8.5
We're going to need to be able to connect to our database from the service. Since I'm going to connect to Oracle I'm going to grab their Instant Client driver. You'll want the Basic package, as that's the one that provides support for JDBC-OCI connections. Also make sure you get the one that matches the bitness of the Eclipse IDE you'll be using (64 bit for 64bit, 32 bit for 32 bit).
Oracle Instant Client
What we're going to use to create the service is Apache Olingo. It comes in a couple of different flavors, and this is the one time we're not going to use the latest and greatest version. The issue is that there have been four different versions of OData. Versions 1, 2, and 3 were released by Microsoft. Version 4 was standardized by OASIS and has been submitted to ISO/IEC JTC 1 for consideration as an international standard. However, Version 4 wasn't finalized until March of 2014, and PowerBuilder 12.6 was released on August of 2014, which means it was originally built to support an earlier version of OData (specifically Version 2). There are significant differences between Version 2 and Version 4. Olingo comes in two versions, one that supports Version 2 and one that supports Version 4. Since Version 2 is what PowerBuilder is most compatible with, we're going to use the version of Olingo that supports Version 2.
We're also going to use the Java Persistence API to expose the database tables as objects to Olingo. Therefore, the particular download of Olingo we want is the one that is titled "Olingo OData2 JPA Processor". That package contains the core Olingo libraries, so there is no need to download those separately.
Apache Olingo
The Java Persistence API is part of the EclipseLink libraries:
EclipseLink
Finally OData is dependant on Apache CXF, so we'll need to grab that too.
Apache CXF
Configuring the Eclipse IDE
Now that we've downloaded everything we need to configure Eclipse and create our OData service project.You'll need to configure Eclipse to use Tomcat. To do that, open the Servers tab ( Window->Show View->Servers).

If you have no servers defined, all you should see is a link to create a definition for one.

If not, right click in the Servers tab and select New Server


In the next page of the dialog, indicate the folder that you unzipped the Apache Tomcat download into.

You'll also need to create a database connection to the database in question. Open the Data Source Explorer view (Window -> Show View -> Data Source Explorer).

In the Data Source Explorer, right click on "Database Connections" and select "New..."

In the dialog that appears, select Oracle as the profile type and give it a name. Hit "Next".

In the next page of the dialog, click the "New Driver Definition" button to the right of the Drivers drop down.

In the dialog that appears, select the Oracle thin driver.

If Eclipse is unable to find the Oracle thin client jar file (or is looking for the wrong one, since it appears to look for odbjc14.jar by default) use the JAR list tab of the dialog and the "Add JAR/Zip" file to located the thin client jar file.

The next page of the dialog is where you will enter the connection string information to connect to the database.

Enter that information, ping the database to make sure the connection works, and then hit Finish.
Create a Dynamic Web Project
Now we're ready to start creating the service. Click File->New-> Dynamic Web Project.
In the dialog that appears, give the project a name. Before moving on though, click the "Modify" button in the middle of the dialog.

In the dialog that appears, check the JPA option and then close the dialog.

Click "Next" on the original dialog until you get to the "JPA Facets" page. On that page
- change the "Platform" from "Generic" to "EclipseLink"
- change "JPA Implementation" from "User Library" to "Disable Library Configuration"
- select the connection you created early in the "Connection" option
- check the "Add driver library to build path"
- ensure that the "Annotated classes must be listed in persistence.xml" option is checked

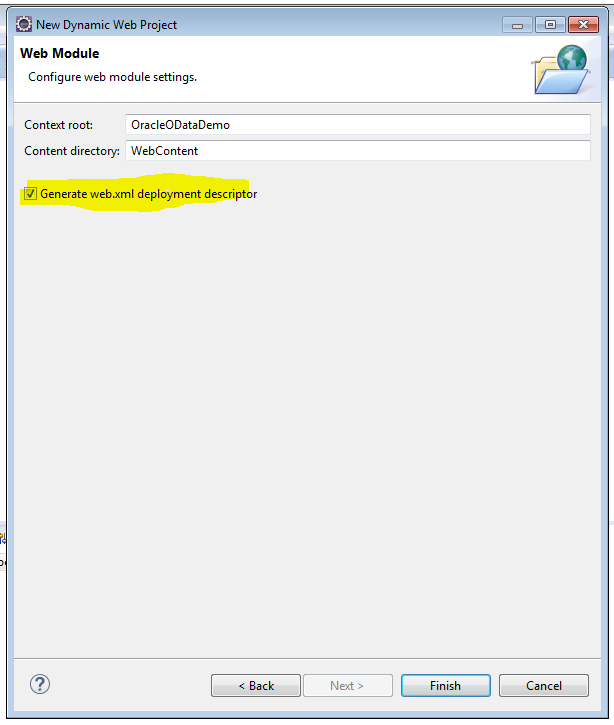
Click "Next" to the Web Module page. On that page ensure that "Generate web.xml deployment descriptor" is checked. Click Finish.
We need the dependant jar files to the project now. In the Project Explorer open the WebContent folder, then the WEB-INF folder, and finally the lib folder. Open up Windows File Explorer to the folder where you unzipped the Olingo libraries. Select all but one of the jar files and drag them into the WEB-INF/lib folder. Do not copy the javax.ws.rs-javax.ws.rs-api-2.0-m10.jar file as we'll be using a more recent version of that library

When prompted, select Copy.

- com.google.code.gson-gson-2.2.2.jar
- commons-codec-commons-codec-1.6.jar
- org.apache.olingo-olingo-odata2-api-2.0.4.jar
- org.apache.olingo-olingo-odata2-api-annotation-2.0.4.jar
- org.apache.olingo-olingo-odata2-core-2.0.4.jar
- org.apache.olingo-olingo-odata2-jpa-processor-api-2.0.4.jar
- org.apache.olingo-olingo-odata2-jpa-processor-core-2.0.4.jar
- org.eclipse.persistence-javax.persistence-2.0.5.jar
In Windows File Explorer, navigate to the folder where you unzipped EclipseLink and copy the eclipselink jar file into the WEB-INF/lib folder.

The file you will copy should be the following, or similar:
- eclipselink.jar
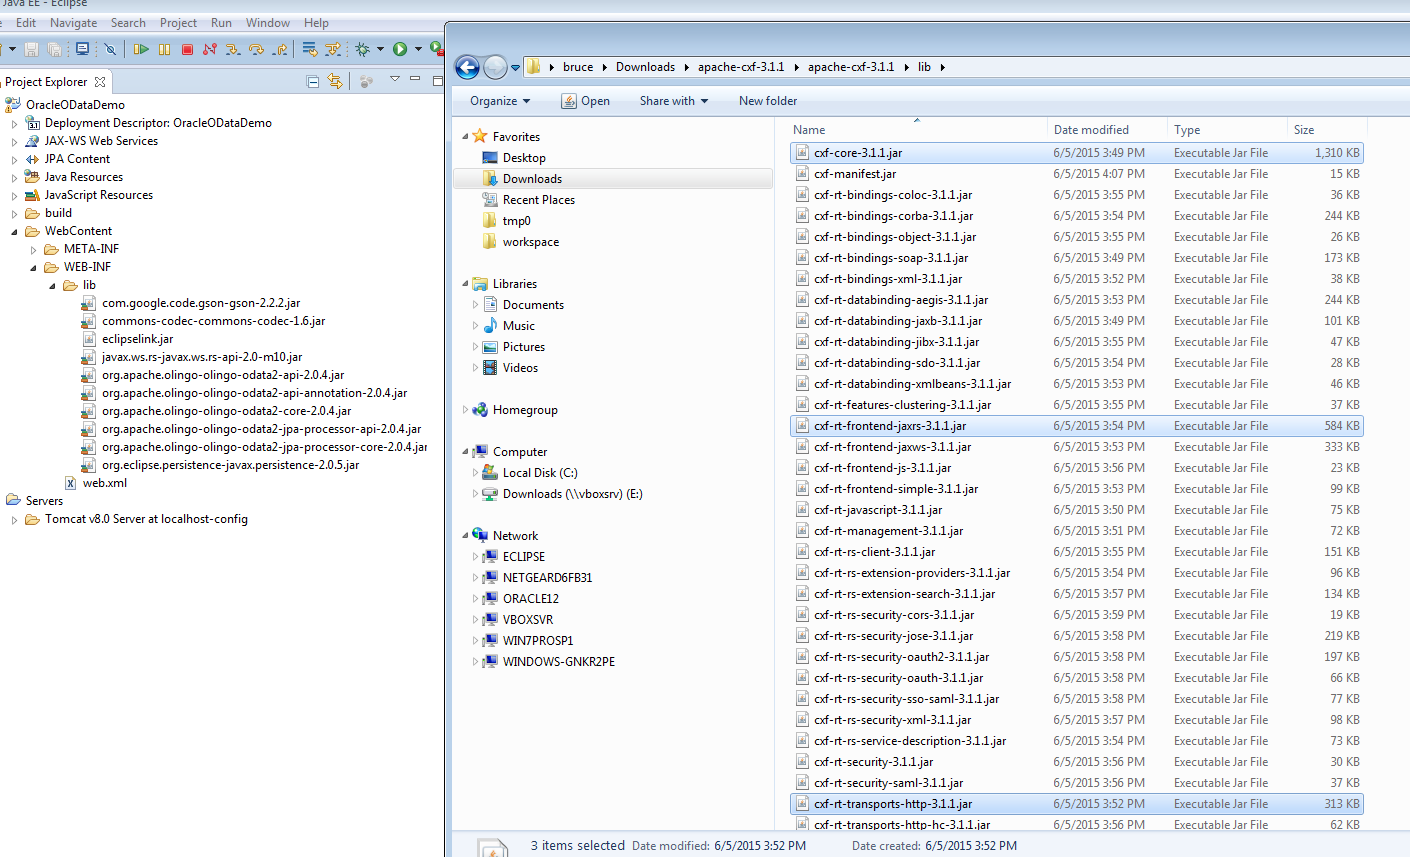
Finally, in Windows File Explorer navigate to the folder where you unzipped Apache CFX. You only need to copy four of the jar files into the project, specifically:
- cxf-core-3.1.1.jar
- cxf-rt-frontend-jaxrs-3.1.1.jar
- cxf-rt-transports-http-3.1.1.jar
- javax.ws.rs-api-2.0.1.jar
Create a JPA model
Now we need to create a JPA model that will expose the tables in the database as java objects. To do that, select File -> New -> JPA -> JPA Entities from Tables and hit Next.

In the Select Tables page, select the database connection, the schema and then the tables you want to expose through the service. For this sample, I'll be exposing the DEPT and EMP tables from the SCOTT schema. The SCOTT schema is a demo schema that can be optionally installed in an Oracle database during the install, or added later with Oracle provide scripts.

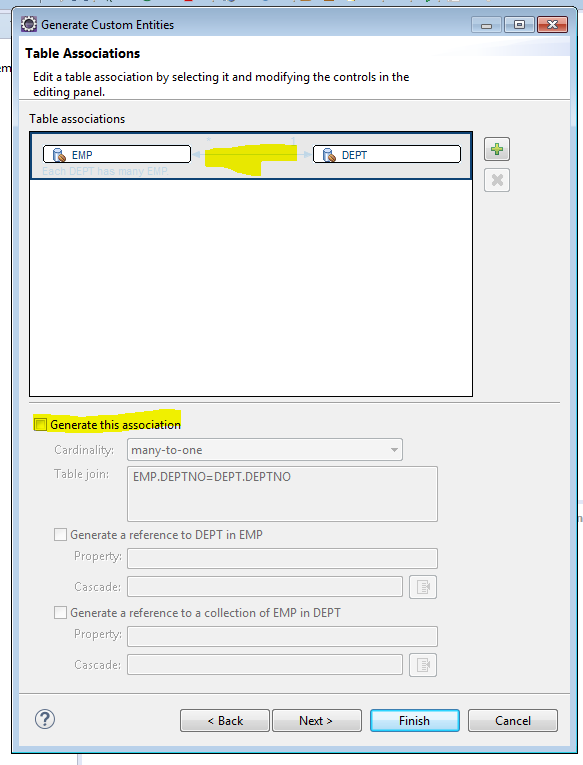
Make sure that the "List generated classes in persistence.xml" option is checked. Click "Next" to the Table Associations page. Click on the link between the emp and dept tables and then uncheck the "Generate this association" checkbox. Otherwise the classes will be generated with references to each other, which PowerBuilder can't update. There also appears to be a bug in this version of Olingo in handling the "deep insert" having such an association generated would require.
Click Next to get to the "Customize Defaults" page. Here make sure that "Key generation" is set to "none". JPA offers a number of different mechanisms for generating primary key values for entities including support for identity columns and sequences. Unfortunately, PowerBuilder doesn't recognize when JPA is auto generating the values and requires you populate them from the client.

Make sure that "Always generate optional JPA annotations and DDL parameters" is checked and then hit Finish.
Open up the Java Resource->src-META-INF folder in the Project Explorer and double click the persistence.xml file. In the window that opens there are a set of tabs on the bottom of the window. Click on the Connection tab.
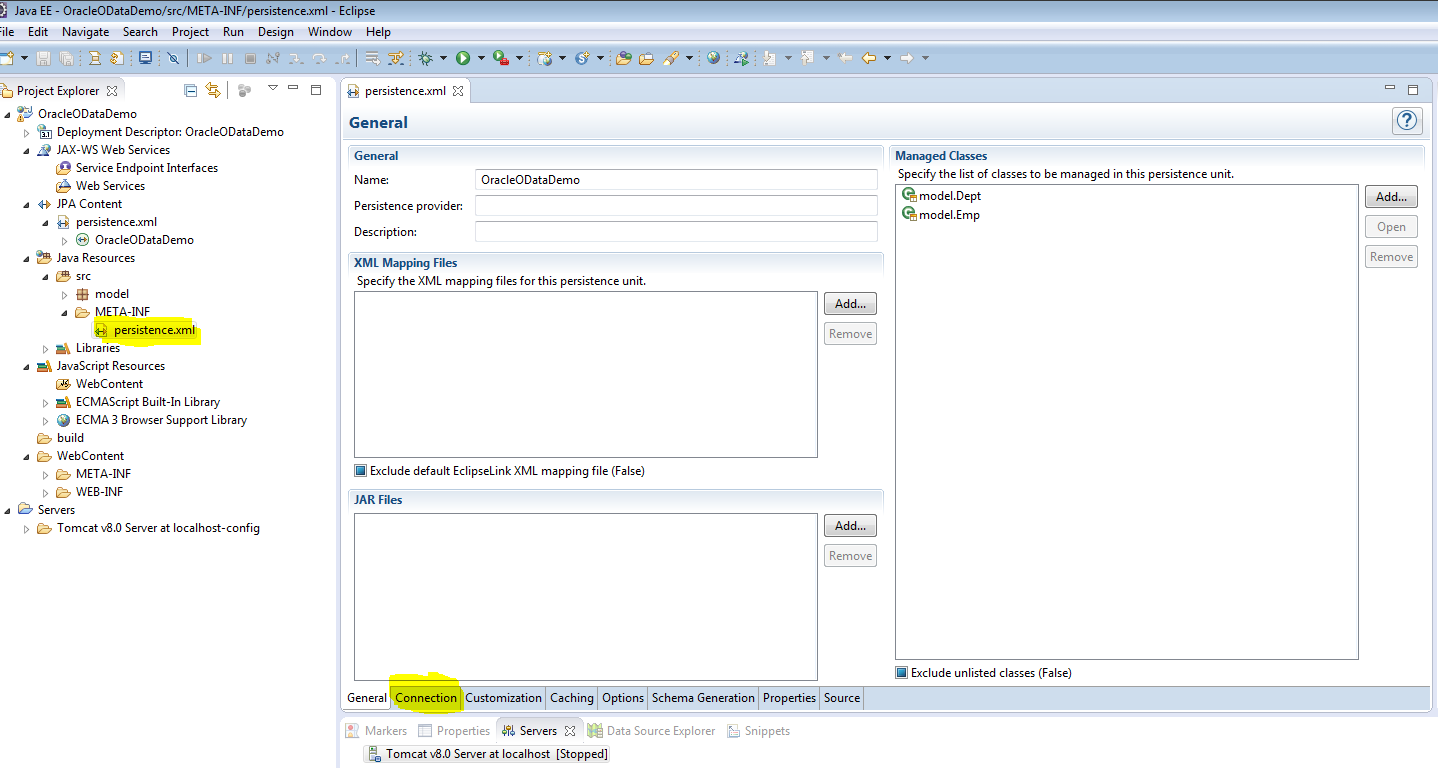
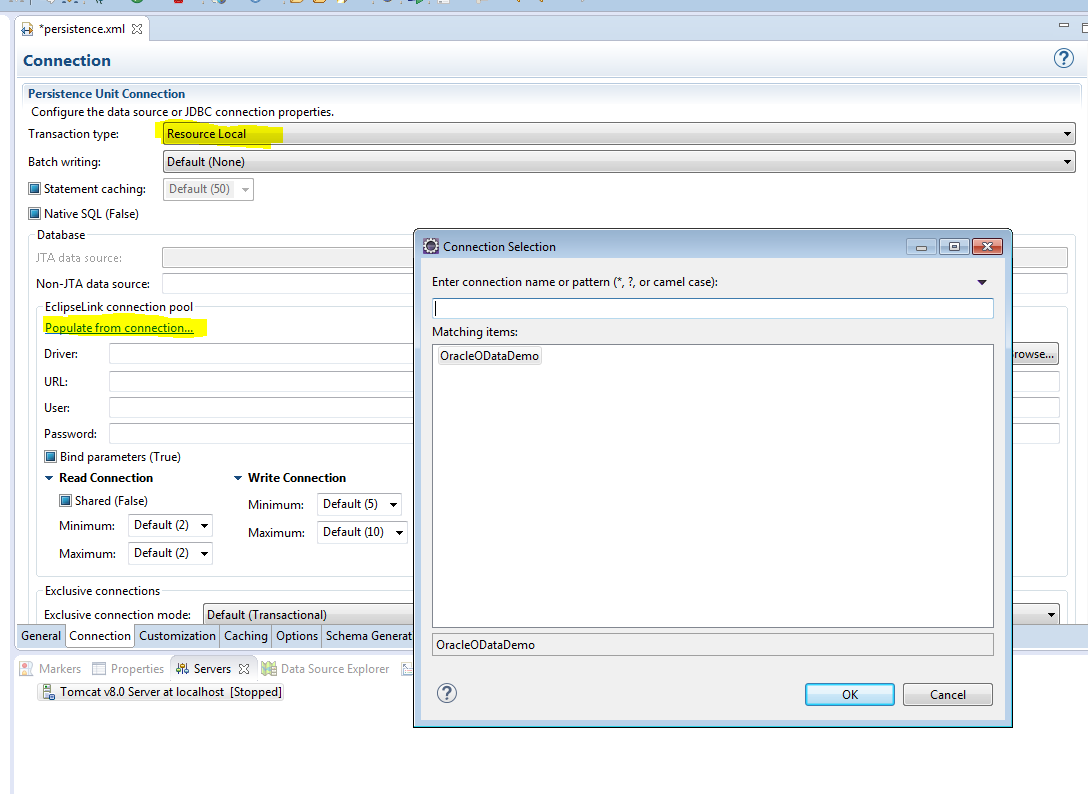
Change the "transaction type" to "Resource local" and then click on the "Populate from connection" link. In the dialog that appears, select the connection you created earlier. That will populate the window with the connection properties from that connection.
Create the service using Olingo
Create a new Java Class ( File->New->Other->Java->Class), then then hit next. In the Java Class page, give the class a name. In this case, I'm using EmployeeServiceFactory. Next to Superclass, click the Browse button. In the dialog that appears you can start typing characters and the dialog will show you classes in the library search path that match. Enter enough to get the ODataJPAServiceFactory class to appear and select it.

The editor will open with the new class which contains an overriden method called initializeODataJPAContext. Add the following code:
ODataJPAContext oDataJPAContext = getODataJPAContext();
oDataJPAContext.setEntityManagerFactory(Persistence.createEntityManagerFactory(PERSISTENCE_UNIT_NAME));
oDataJPAContext.setPersistenceUnitName(PERSISTENCE_UNIT_NAME);
setDetailErrors(true);
return oDataJPAContext;
oDataJPAContext.setEntityManagerFactory(Persistence.createEntityManagerFactory(PERSISTENCE_UNIT_NAME));
oDataJPAContext.setPersistenceUnitName(PERSISTENCE_UNIT_NAME);
setDetailErrors(true);
return oDataJPAContext;
The setDetailErrors(true) call is to ensure that we get full error messages while we're doing development, You'll want to comment that out before releasing to production.
Between the declaration of the class name and the declaration of the overridden function, add a static variable declaration similar to:
private static final String PERSISTENCE_UNIT_NAME = "OracleODataDemo" ;
The name will use here is the name you used in the persistence.xml file earlier. Finally, add the following to the imports above the class declaration.
import javax.persistence.Persistence;
You should end up with something like this:

Open up the web.xml file in the WebContent_>WEB-INF directory. Open it using the text editor rather than the XML editor by right clicking on it in the Project Explorer and then selecting Open With->Text Editor. Between the </welcome-file-list> closing tag and the </web-app> closing tag at the end of the file add the following <servlet> and <servlet-mapping> entries.
<servlet>
<servlet-name>ODataServlet</servlet-name>
<servlet-class>org.apache.cxf.jaxrs.servlet.CXFNonSpringJaxrsServlet</servlet-class>
<init-param>
<servlet-class>org.apache.cxf.jaxrs.servlet.CXFNonSpringJaxrsServlet</servlet-class>
<init-param>
<param-name>javax.ws.rs.Application</param-name>
<param-value>org.apache.olingo.odata2.core.rest.app.ODataApplication</param-value>
<param-value>org.apache.olingo.odata2.core.rest.app.ODataApplication</param-value>
</init-param>
<init-param>
<init-param>
<param-name>org.apache.olingo.odata2.service.factory</param-name>
<param-value>main.EmployeeListServiceFactory</param-value>
<param-value>main.EmployeeListServiceFactory</param-value>
</init-param>
<load-on-startup>1</load-on-startup>
<load-on-startup>1</load-on-startup>
</servlet>
<servlet-mapping>
<servlet-mapping>
<servlet-name>ODataServlet</servlet-name>
<url-pattern>/emplist.svc/*</url-pattern>
<url-pattern>/emplist.svc/*</url-pattern>
</servlet-mapping>
For the third entry, the value you provide for the service.factory will be the name of the java class you created earlier for the Olingo service. In the servlet-mapping, the url-pattern is the url that you will be accessing the service through.
Create a new HTML file in the WebContect directory by right clicking on the folder and selecting New->HTML File. Call the new file index.html. When it opens in the editor, give the document a title and add the following to the body.
<h1>Employee Service</h1><br>
<a href="/OracleODataDemo/employee.svc/">Service Document</a><br>
<a href="/OracleODataDemo/employee.svc/$metadata">Metadata</a><br>
<a href="/OracleODataDemo/employee.svc/Depts">List of Depts</a><br>
<a href="/OracleODataDemo/employee.svc/Emps">List of Employees</a>
<a href="/OracleODataDemo/employee.svc/">Service Document</a><br>
<a href="/OracleODataDemo/employee.svc/$metadata">Metadata</a><br>
<a href="/OracleODataDemo/employee.svc/Depts">List of Depts</a><br>
<a href="/OracleODataDemo/employee.svc/Emps">List of Employees</a>
Where I have OracleODataDemo in those urls, you would have the project name. Where I have employee.svc you would use the servlet url-pattern you defined in the web.xml file. The Depts and Emps are the name of the classes that were created in the JPA model.
Run the service
Right click on the project and select Run As->Run on Server. Click Finish on the dialog that appears.

After the service deploys, the index.html page appears.
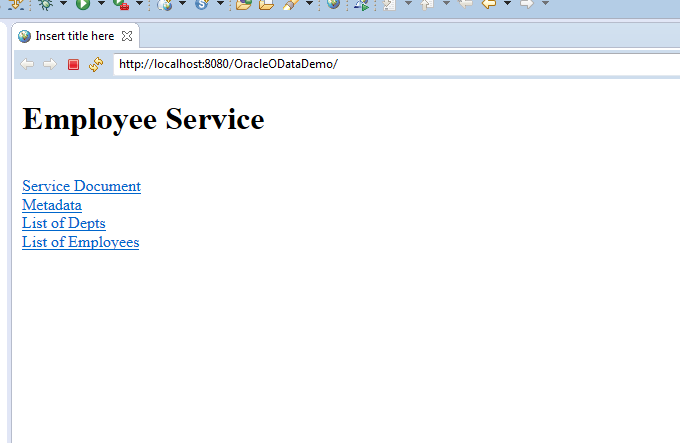
You can try out the links to ensure that the service is working. The "Service Document" link will download an XML file. The Metadata link will display the service metadata xml file in the browser.

The other two links will retrieve the list of employees and list of departments. The result will display in the browser in JSON format.

Using the OData service from PowerBuilder
The first thing we're going to do in order to use this from PowerBuilder is to create a database profile that points to it. Click the DB Profile button in the toolbar. In the Database Profiles dialog select the "ODT OData" folder and then click the "New..." button. In the dialog that appears give the profile a name and enter the URL for the service document (you can get that by right clicking on the link in the web page and selecting "Copy shortcut".
Connect to the new database profile and open the Database painter. You'll see that the tables show up there just as if you were using a database driver to connect to the database. You can retrieve and edit data in the painter as well. What you can't do is perform data model changes.

Now that we've got a database profile, lets create a DataWindow to access the service. File->New->DataWindow->Grid. In the "Choose Data Source for Grid DataWindow" dialog, select "OData Service".

Click Next and you'll be presented with a list of the OData profiles you've defined. That's why we wanted to create the profile first (although you can create a new one here if you didn't).

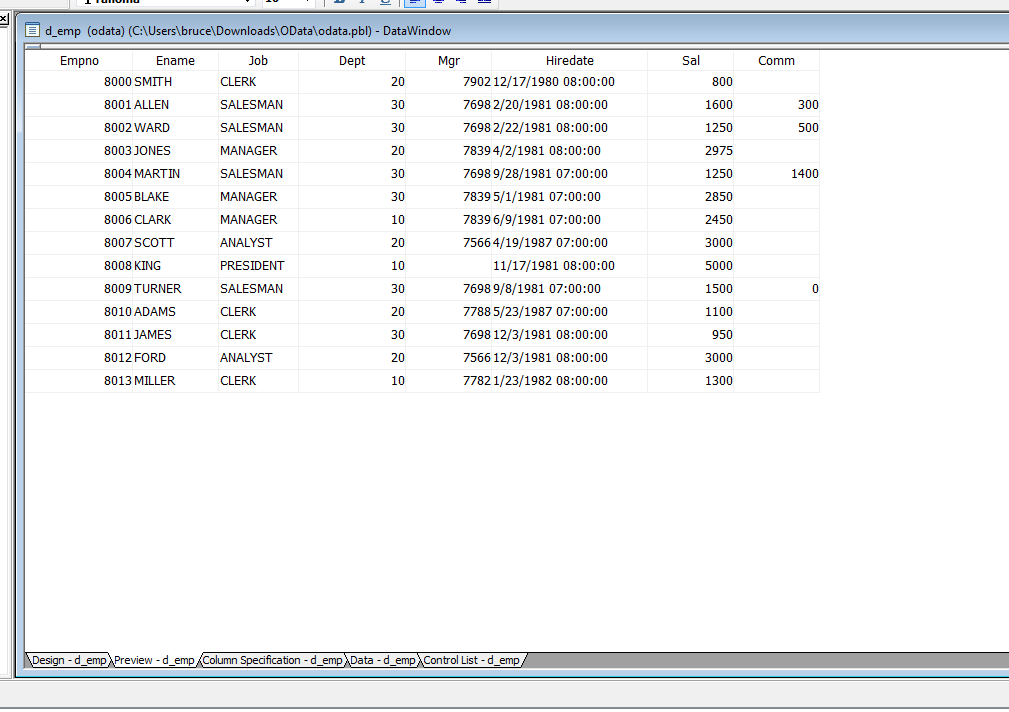
Click Next and you'll be presented with a list of tables defined in the service. Select the Emps table and hit Open.

Once the table displays in the DataWindow painter, select the columns you want to include.

Click the Return button and you'll be taken back to the wizard, click Next and then Finish. Preview the data if you wish.
I've created a small app that uses the DataWindow. The app object just opens the w_main window in it's open script.

I've created a ue_postopen event and posted to that event from the open event of the window. In the ue_postopen event I have the following:
SetPointer ( HourGlass! )
// Profile OracleODataDemo
SQLCA.DBMS = "ODT"
SQLCA.DBParm = "ConnectString='URI=http://eclipse:8080/OracleODataDemo/employee.svc'"
CONNECT ;
IF SQLCA.sqlcode = 0 THEN
// Profile OracleODataDemo
SQLCA.DBMS = "ODT"
SQLCA.DBParm = "ConnectString='URI=http://eclipse:8080/OracleODataDemo/employee.svc'"
CONNECT ;
IF SQLCA.sqlcode = 0 THEN
dw_1.SetTransObject ( SQLCA )
cb_dekete.enabled = TRUE
cb_insert.enabled = TRUE
cb_retrieve.enabled = TRUE
cb_update.enabled = TRUE
cb_dekete.enabled = TRUE
cb_insert.enabled = TRUE
cb_retrieve.enabled = TRUE
cb_update.enabled = TRUE
ELSE
MessageBox ( "Connect Error" , SQLCA.sqlerrtext )
END IF
SetPointer ( Arrow! )
SetPointer ( Arrow! )
The cb_retireve button just has:
dw_1.Retrieve()
The cb_update button has:
integer li_rc
string ls_errortext
li_rc = dw_1.Update ( TRUE, FALSE )
IF li_rc = 1 THEN
string ls_errortext
li_rc = dw_1.Update ( TRUE, FALSE )
IF li_rc = 1 THEN
COMMIT ;
dw_1.resetupdate( );
MessageBox ( "Update Complete", "" )
dw_1.resetupdate( );
MessageBox ( "Update Complete", "" )
ELSE
ls_errortext = SQLCA.Sqlerrtext
ROLLBACK ;
MessageBox ( "Update Error", ls_errortext )
ROLLBACK ;
MessageBox ( "Update Error", ls_errortext )
END IF
The cb_insert button has:
dw_1.InsertRow(0)
The cb_delete button has:
long ll_row
ll_row = dw_1.GetRow()
IF ll_row > 0 THEN
ll_row = dw_1.GetRow()
IF ll_row > 0 THEN
dw_1.DeleteRow(ll_row)
END IF
As you can see, with the exception of the population of the SQLCA attributes before the CONNECT this is all standard DataWindow related PowerScript code. Only the SQLCA attributes gives any indication this isn't a native database driver based DataWindow.
Overcoming Some PowerBuilder Limitations
The one issue with this implementation is that most database designs call for surrogate keys. DBAs and developers have long discovered that using natural or 'intelligent' key leads to problems when turns out they weren't as immutable as was originally thought and the primary key value has to be updated. Database generated surrogate keys are truly immutable, avoiding such problems.JPA has great support for handling database generated surrogate keys on insert. Refer back to the "Key Generation" option we had available to us when we were creating the JPA Model.

There were three other options available:
- Identity - For databases like Microsoft SQL Server, MySQL, SQLAnywhere, earlier versions of DB2 and the most recent version of Oracle that have identity or autoincrementing columns, JPA will simply allow the database to set the key value and then use it.
- Sequence - For databases like Oracle,PostgreSQL, and the newer version of DB2 that have sequences that are used to create surrogate keys, JPA can be easily configured to automatically obtain a value from the sequence and use it for the key value.
- Table - For databases that don't support either of the first two options, or to provide better cross-database compatibility in the code, JPA also supports the use of a lookup table to generate they key values.
The problem is that although we could have used one of those options, the PowerBuilder DataWindow doesn't recognize when it's being used or have any options available to us to tell it that they keys are being generated in the database. When you're using a normal SQL Select DataWindow, there are options in the update properties that allow you to indicate that the key column is an identity (or autoincrementing) column. If you do that, PowerBuilder looks in the PBODBXXX.INI file (where XXX is the major version of PowerBuilder) to find the SQL statement it should use to determine what value the database assigned to the column on insert.
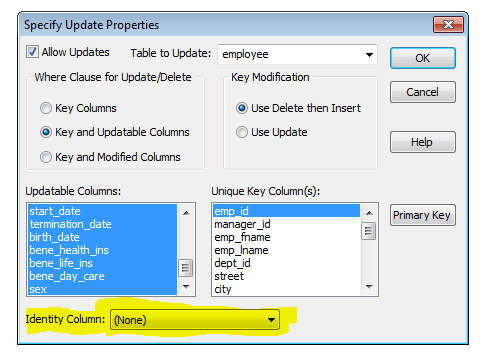
Instead, if you leave the entity key column empty on an insert, you'll get an error message from PowerBuilder indicating that the column cannot be null. That's our first problem.
Since this is Oracle, I'm going to want to provide a method in the service that allows the client to obtain the next value for a sequence that is used to generate the key during inserts. To do that, I'm going to create an EdmFunctionImport. To do that, create a new class file (right click on Java Resources in the Project Explorer and then select New->Class File). Give the class file the name Sequence. Once the class file is open in the editor, add the following code.
package model;
import java.math.BigDecimal;
import javax.persistence.EntityManager;
import javax.persistence.Persistence;
import javax.persistence.Query;
import org.apache.olingo.odata2.api.annotation.edm.EdmFunctionImport;
import org.apache.olingo.odata2.api.annotation.edm.EdmFunctionImport.HttpMethod;
import org.apache.olingo.odata2.api.annotation.edm.EdmFunctionImport.ReturnType;
import org.apache.olingo.odata2.api.annotation.edm.EdmFunctionImport.ReturnType.Type;
public class Sequence {
private EntityManager em;
public Sequence() {
public Sequence() {
em = Persistence.createEntityManagerFactory(Constants.PERSISTENCE_UNIT_NAME).createEntityManager();
}
@EdmFunctionImport(returnType = @ReturnType(type = Type.SIMPLE, isCollection = false), httpMethod = HttpMethod.GET)
public long getEmpNoSeq (){
@EdmFunctionImport(returnType = @ReturnType(type = Type.SIMPLE, isCollection = false), httpMethod = HttpMethod.GET)
public long getEmpNoSeq (){
BigDecimal empno;
Query q = em.createNativeQuery( "select emp_seq.nextval from dual" );
empno = (BigDecimal) q.getSingleResult();
return empno.longValue() ;
Query q = em.createNativeQuery( "select emp_seq.nextval from dual" );
empno = (BigDecimal) q.getSingleResult();
return empno.longValue() ;
}
}
Because I'm now referring to the persistence unit name from two different classes (this one and the EmployeeServiceFactory earlier), I moved the declaration of the PERSISTANCE_UNIT_NAME constant to a separate class called Constants:
package model;
public class Constants {
public class Constants {
public static final String PERSISTENCE_UNIT_NAME = "OracleODataDemo" ;
}
package model;
import java.io.InputStream;
import org.apache.olingo.odata2.jpa.processor.api.model.JPAEdmExtension;
import org.apache.olingo.odata2.jpa.processor.api.model.JPAEdmSchemaView;
public class SequenceExtension implements JPAEdmExtension {
import java.io.InputStream;
import org.apache.olingo.odata2.jpa.processor.api.model.JPAEdmExtension;
import org.apache.olingo.odata2.jpa.processor.api.model.JPAEdmSchemaView;
public class SequenceExtension implements JPAEdmExtension {
@Override
public void extendJPAEdmSchema(JPAEdmSchemaView view) {
public void extendJPAEdmSchema(JPAEdmSchemaView view) {
view.registerOperations(Sequence.class, null);
}
@Override
public void extendWithOperation(JPAEdmSchemaView view) {
@Override
public void extendWithOperation(JPAEdmSchemaView view) {
// TODO Auto-generated method stub
}
@Override
public InputStream getJPAEdmMappingModelStream() {
@Override
public InputStream getJPAEdmMappingModelStream() {
// TODO Auto-generated method stub
return null;
return null;
}
}
We've got one more step. We need to go back and edit the EmployeeServiceFactory to call this new class. Open that file, and add the following right before the setDetailErrors(true) statement:
oDataJPAContext.setJPAEdmExtension((JPAEdmExtension) new SequenceExtension());
I've also added the following line to help with debuging should we encounter problems:
oDataJPAContext.getODataContext().setDebugMode(true);
If you run the service now and then look at the metadata, you should see the new function import exposed there.

To make sure it working or to debug it if it isn't, I'm going to modify the index.html file so we can invoke the function directly from the browser by clicking on a another link. Open the index.html file and add the following below the link for the List of Employees:
<a href="/OracleODataDemo/employee.svc/getEmpNoSeq">Employee Sequence</a>
If you run the app now and click on that new link, you should see the value that is being generated by the sequence.

And now we run into our second problem with PowerBuilder. If we go back into the database editor and look at the schema for our OData data base, you'll see that the only objects it shows are the tables (no functions). In addition, the only thing PowerBuilder allows you to do with an OData based data source is to interact with tables via a DataWindow or simple CRUD operations in the Database Painter. You can't write SQL statements that operate against it either in PowerScript or in the ISQL Session panel in the Database Painter.
So, how do we access our new method? Well, since it's essentially a REST web service call, we have several options. Perhaps the easiest is to use the inet and internetresult objects and then parse the result by doing a XML import into a DataWindow. Let's start with the DataWindow Object. I'm going to create an External Source grid DataWindow Object. I'm going to define only one column in the result set, a column called "getempnoseq" (to match the tag in the XML being returned) with a type of long. I've also cleaned up the default XML template a bit. I named the datawindow d_empnoseq.

I then created a custom user object of type datastore called n_ds_empno and assigned this DataWindow object to it.

I prefer doing this rather than creating a generic datastore in script and then assigning the Datawindow Object to it in script. You can do it whichever way you prefer.
Now create a custom user object of type internetresult. Add an instance variable to it of type long called empno. Add the following to the internetdata function.
integer li_rc
string ls_data
n_ds_empno lds
ls_data = String ( data, EncodingANSI! )
lds = CREATE n_ds_empno
li_rc = lds.ImportString ( XML!, ls_data )
empno = lds.GetItemnumber( 1, 'getempnoseq')
Destroy lds
Return li_rc
string ls_data
n_ds_empno lds
ls_data = String ( data, EncodingANSI! )
lds = CREATE n_ds_empno
li_rc = lds.ImportString ( XML!, ls_data )
empno = lds.GetItemnumber( 1, 'getempnoseq')
Destroy lds
Return li_rc
What this will do is take the result from the web service, parse it using the DataWindow Object, and then extract the value of the newly generated sequence value and assign it to the instance variable.
For simplicity I've added a window function to the w_main window called fn_getempnoseq. In an actual production app you'd probably want to put this in another non-visual object for better code separation and reuse. In that function, I've added the following:
integer li_rc
inet linet
n_cst_empno lnv_empno
long ll_empno
linet = CREATE inet
lnv_empno = CREATE n_cst_empno
li_rc = linet.GetURL("http://eclipse:8080/OracleODataDemo/employee.svc/getEmpNoSeq", lnv_empno)
ll_empno = lnv_empno.empno
DESTROY lnv_empno
DESTROY linet
Return ll_empno
inet linet
n_cst_empno lnv_empno
long ll_empno
linet = CREATE inet
lnv_empno = CREATE n_cst_empno
li_rc = linet.GetURL("http://eclipse:8080/OracleODataDemo/employee.svc/getEmpNoSeq", lnv_empno)
ll_empno = lnv_empno.empno
DESTROY lnv_empno
DESTROY linet
Return ll_empno
What we're doing here is actually calling the new service function, passing in the non visual object we created earlier that extracts the result. Then we pull the value off the non visual object and return it from the function.
Finally, let's go back to our Insert button. Instead of simply doing dw_1.InsertRow we're now going to do the following:
long ll_row
long empno
ll_row = dw_1.InsertRow(0)
empno = fn_getempnoseq( )
dw_1.SetItem ( ll_row, 'empno', empno )
long empno
ll_row = dw_1.InsertRow(0)
empno = fn_getempnoseq( )
dw_1.SetItem ( ll_row, 'empno', empno )
So, after we insert the new row we capture the row number of the inserted row, use the window function to determine what the next employee number sequence value is, and then set the value of the key column in the DataWindow with that value.
At a minimum, you should remove the tab order of the key column, make the column display only and/or set the protect attribute to 1. If the key value is of no value to the end user, simply remove it from surface of the DataWindow object or mark it non visible.
One problem with populating the value on the insert is that the itemstatus for the row then gets set to NewModified rather than New. That means that the DataWindow will attempt to insert the new row even if the user doesn't change any other column values. This would result in required column errors or the insertion of an empty row in the database, which the user may find confusing or undesired behavior. You may want to set the ItemStatus of the row back to New after setting the key value so that an insert is not attempted unless the user enters additional data.
Another alternative to adding the value on the Insert would be to look through the DataWindow prior to issuing the update, looking for rows that have their row ItemStatus of NewModified and then populating the key. One particular advantage of this later approach is that it means that new sequence values are pulled if they are actually going to be used.
Conclusions
Hopefully, you've seen just how powerful the OData capability is (particularly in eliminating the need for native database drivers) and how relatively simple it is to create services that can expose any database through OData services, even if it is not a native capability of that database.While we were able to put together an working solution with PowerBuilder 12.6, there are some things it would be useful to see in later versions that would make it much easier to accomplish. Primary among those are:
- Support for more recent versions of OData, in particular (at the time of the writing of this article) 4.0.
- Support for database generated key values, similar to the Identity Column option in the Update Properties for SQL source Data Windows. Perhaps a similar Update Properties dialog for the OData source Data Windows might allow the developer to select an function import exposed in the metadata as the method used to return the value to be used for they key.
- Support for interacting with the database through PowerScript, in particular the ability to call function import through PowerScript and/or as RPCFUNC declarations, similar to how we can call stored procedures/functions when using native database drivers.
1 comment:
Bruce, I don't know whether you switched employer to Appeon for future PowerBuilder-developments, but apart from the wishes you mention I wonder how securing this OData communication can be realized without much custom code effort. As it appears your example now only supports anonymous access, no things like OAuth, so going the effort of allowing old fashioned client-server Oracle-communication through the firewall(s) still seems a more stable investment as any of the mentioned products inbetween can be outdated soon, like Java 8, OData 2, which would require fast upgrading and securing for new found internet-vulnerabilities as modern webapplications do.
Post a Comment